Bike Blender Technical Notes
In winter 2011 I worked with Carrie Grabowski, a 5th grade teacher at Charlemagne Elementary, in developing a cool extension to the STC Magnets and Motors curriculum. Carrie's big idea was to blend up smoothies in the classroom using only human power, in a way that reinforces students' understanding of how electric motors work. She won a Toshiba grant to make it happen, and contacted the University of Oregon's GK-12 program for help on the technical side of things.
Together with Rick Glover, I spent my non-research time this winter designing and building the bike blender for Carrie's end-of-term smoothie party. The purpose of this page is to contribute to the sum total of human knowledge by documenting our process as openly as possible.1
Major design choices
There are lots of ways to make a bicycle into a blender. Our take on the project was framed by several key choices.
- Electrical, not mechanical
- Our finished product effectively converts mechanical energy into electrical energy, and back into mechanical energy again. While a direct-drive approach could reduce conversion losses, we needed to tie in with the Magnets and Motors curriculum which Carrie uses.
- DC, not AC
- Although mechanical power generation is naturally suited to producing alternating currents, we decided very early that we didn't want to deal with it. Direct currents are easier to understand and already familiar to the students.
- Generator, not alternator
- Alternators are widely available in any car parts store, but they are only designed to work at very high rotation speeds. For a variety of technical reasons we abandoned our alternator in favor of a generator.
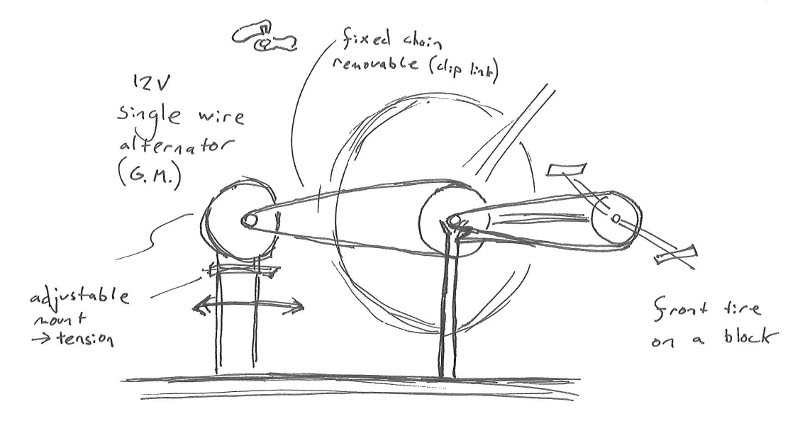
- Chain-linked drivetrain
- From the outset, we sought a way to connect the generator to the bicycle via the chain, instead of the tire. This approach boosts efficiency by cutting any slipping between the bicycle wheel and the generator driveshaft.
Our fourth choice is probably the most unique feature of our design, although not at all the most necessary. Running a belt over a bicycle wheel would probably work just as well, provided it were tight enough to eliminate slipping.
Procuring a generator
The most essential component in the setup is the DC generator.
DC motors are generators
Electric motors consist of one or more coils of wire on a rotating assembly (armature) between two permanent magnets. When current passes through the coils, they become electromagnets, and align themselves with the permanent magnetic field (animation). This rotates the armature to a certain orientation. By switching the direction of current quickly, the coils can be kicked continuously in a circle2. In a DC motor, this kicking sequence is made using a mechanical assembly of brushes sliding over commutators.
This is, in principle, entirely symmetrical. If you turn an electric motor's driveshaft by hand, the orientation of the magnetic field changes with respect to the coils, which induces a voltage. A DC generator is just a DC motor in reverse.
Testing a treadmill motor
Most large electric motors are AC motors, since they are usually part of appliances which plug into the alternating current in your wall outlet. Treadmills are the interesting exception to this rule. 3
After some searching, we found two junked treadmill motors:
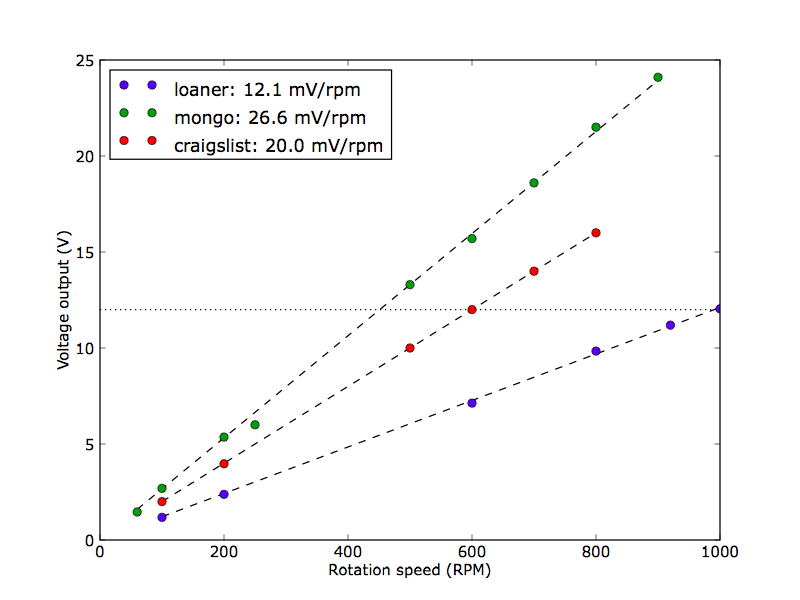
- 'craigslist'
- A 2.5 horsepower home treadmill motor rated for 6700 rpm and 18 amp draw at 130V DC. $5 on craigslist.
- 'mongo'
- A 3.0 horsepower professional treadmill motor rated for 4650 rpm and 23.5 amp draw at 118V DC. $50 from Fitness Equipment of Eugene, a local parts dealer.
I just transcribed these stats from the label - they relate to using these motors as motors. It isn't immediately obvious which numbers are relevant when they're used as generators instead.
So we did an experiment.
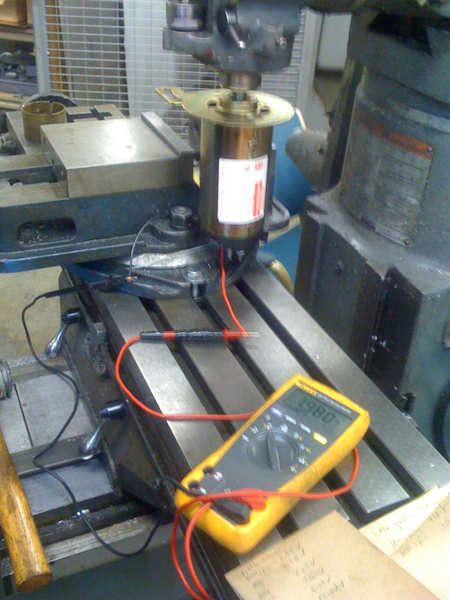
We hooked them up to the mill and spun them at various RPMs, measuring the open-circuit voltage.
We did this for both of our motors and for another small treadmill motor someone loaned us.
The open-circuit voltage isn't a particularly good absolute measure of anything - the true voltage across the generator will depend on the load it's under (e.g., how much ice is in the blender). However, it is good relative comparison of how these three motors perform.
'Mongo' is the most powerful generator of these three. Not surprising: the pro treadmill motor dwarfs the other two. It weighs about 30 pounds by itself.
Transmission
Our next design choice was how to make the bike turn our chosen generator.
Figuring that the pedals were rotated at 80rpm (a pretty brisk cadence), we would need a fairly high gear ratio to push our generator into the high-RPM range where it is most powerful. On my own 7-speed road bike (which I prototyped things on), the existing gearing provides a step-up ratio of only 2 or 3 between the pedals and the rear axle. We needed a bigger step up than that.
The Vision
I envisioned adding a second chain to the largest cog on the rear gear stack ('cassette'). The other end of this chain would drive the motor, and add in another step up factor of 2 or so.4 Within the remaining six gears, the rider would have room to dial in their cadence using the shifters on the bike.
There's two reasons why this was a bad idea:
- Things would get ugly the minute anybody shifts to low gear and puts one chain on top of the other.
- More perilously, this setup bypasses the freewheel mechanism between the gear stack ("cassette") and the bike wheel. Spin the generator up, and the pedals keep turning. This is a hazard.
I wasn't sure how to work around hazard #2, but hazard #1 might be solved by running the second chain off of a dedicated cog on the other side of the hub (using a dual-threaded, "flip-flop" hub). I headed to the bike shop with this idea.
The Solution
Joe, a genius mechanic at Paul's Bicycle Way of Life in South Eugene, engineered this beautiful solution.
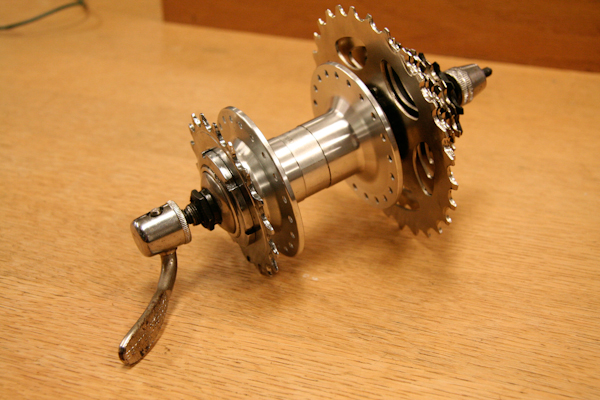
What you see here is a hub for a tandem bicycle. It's as close as you can get to a freewheeling flip-flop hub: Rather, it is a freehub5 with an extra thread on the other side. The extra thread is for your drum brake rotor - thus, it turns with the wheel, and not the cassette.
In place of the brake rotor, Joe installed a fixed-gear cog and capped it in place with a bottom bracket piece. (In Joe's words: "None of these parts are designed to work together.")

On the opposite side, a standard 7-speed cassette. The existing shifters on a 7-speed won't know the difference.

The only drawback here is the excessive width of the tandem hub. By removing the spacers and grinding off some of the axle, Joe made it to be only 2mm wider than a typical non-tandem hub. Steel frames easily stretch to accomodate, but the highest (smallest) gear will probably be unusable because it spins so close to the frame. On one bike, we had to file off a small piece of the derailleur mount to make room for the hub to spin.
I named this unit the frankenhub. It's the lynchpin of the entire setup, and all credit is due to Joe.
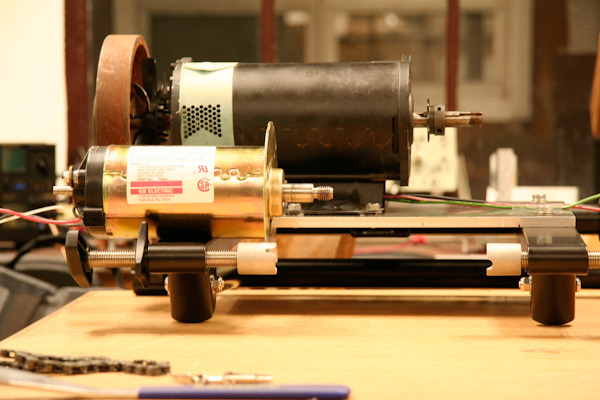
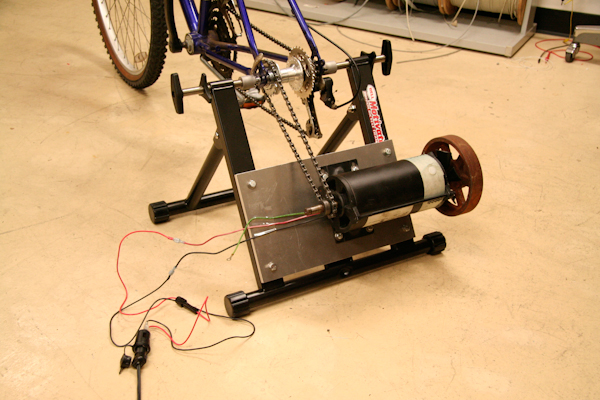
Mounting
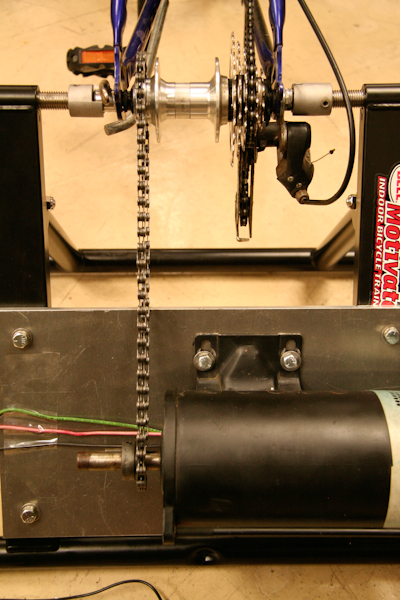
What's left is to make everything work together. I bought a Bell "Motivator" indoor bicycle trainer from Amazon6, removed the resistance mechanism, and bolted a 1cm thick aluminum plate in its place. Our generator came with a slotted mounting bracket, which made it easy to tension the chain by sliding the generator up and down on the plate (although we only had to do this once). The massive generator leaves this stand feeling a little tippy, but it's rock solid with the bike attached.
The two threaded supports clamp on to the quick-release caps on the hub and support the rear of the bike. They also make it possible to adjust the fixie gear side-to-side so that it's in line with a cog on the generator shaft.
Our treadmill motor had a driveshaft which was slotted and keyed. This isn't compatible with any bicycle parts that I know of, so we searched industrial suppliers for keyed sprockets with a 1/2-inch (bicycle chain) gear pitch. We wound up with a 10-tooth roller chain sprocket from McMaster-Carr.
A bicycle chain is too narrow to fit over the teeth on this cog. I couldn't find any narrower sprockets, so I modified this part by grinding 3/4 of its thickness off on the lathe.
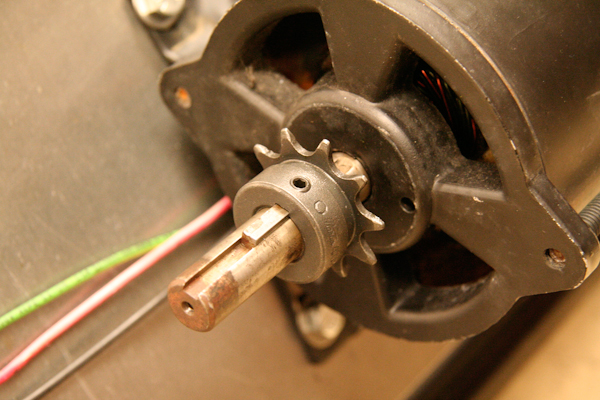
This step was only necessary because our particular treadmill motor had a keyed driveshaft. Other motors are threaded, and some have belt wheels7.
The finished product
I did much of the prototyping for this project using my own 7-speed road bike. For the final version, we bought a more 5th-grade friendly 7-speed from a second-hand store for $30.
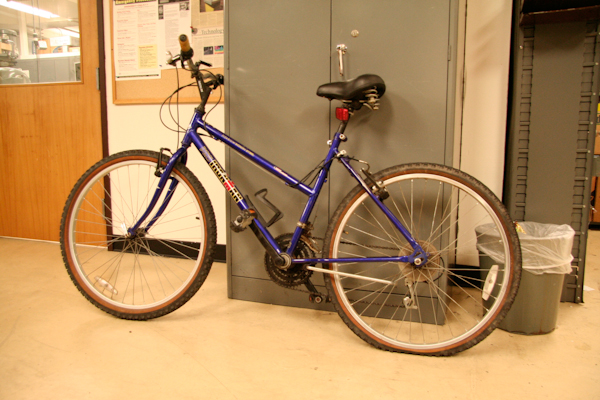
The back tire doesn't hold air. No worries, we won't be needing it.
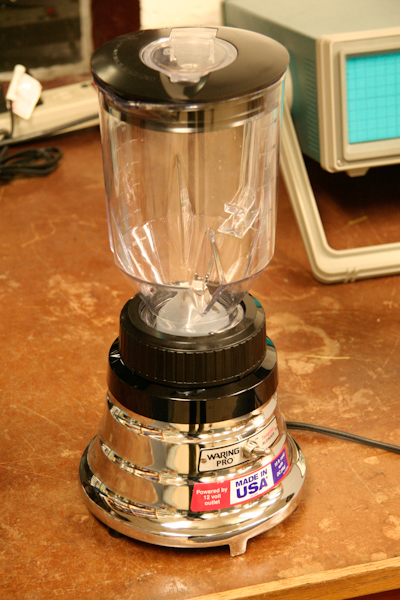
Most kitchen blenders are driven by AC motors, but 12V DC versions are made for RV campers. We had trouble finding one in town, so ours (a Waring TG15 "Tailgater") had to be ordered from amazon. I chose this particular unit because it's simple: No speed settings, no built-in battery, just an on/off switch and a 15 foot power cable to a standard 12V plug.
Of course, the generator will put out more or less than 12V, depending on the pedal speed and gearing, but the motor in the blender doesn't care - it'll just spin faster or slower. Other appliances wouldn't be so forgiving, however.
Conclusions
I'm very happy with how the bike blender turned out. There's two technical points where I think the project could be improved.
Gear ratio a touch low
I wanted the bike to be geared so that students could feel the pedaling resistance reduce as the smoothie is blended - like cresting a hill on a real bicycle.
The gear ratio I chose was workable, but a little on the low side. It's very easy to turn the pedals in high gear with only a blender attached - even for a 5th grader. Switching the blender on and off produces only a subtle change in the pedaling resistance8. The difference between beginning and end of the smoothie is hardly noticeable at all.
This difference might be more dramatic if we had a higher gear ratio. At higher torque, I think it would be easier to feel what typical electrical loads feel like. This could be achieved by using a chainring in place of our fixie gear, or scrapping the chain-linked approach and using a belt around the rear wheel.
Too much dependence on a machine shop
By building a chain-linked system, Rick and I avoided a lot of frictional losses, and produced a very efficient machine. However, we used a lot of heavy machinery to do it - for example, the drive gear on the generator had to be lathed to bicycle-chain width because we couldn't buy a suitable part off the shelf.
I would rather have produced a bicycle blender recipe that can be followed by people without access to the great machine shop facilities that I do. This would be a great class project for an ambitious group of high school students, if they had the resources.
I encourage schools and teachers interested in bicycle blending to try wrapping a belt around the rear bike wheel instead of messing with more bicycle chains. This has the potential to be much simpler and still achieve a working result.
Of course, every approach has its own challenges, and making junkyard parts work together is going to be a different problem for everyone. The most important thing is to have fun, learn something, and share your experience with others.
Contact
If you build your own bicycle blender, I'd love to hear how you do it. Hit me up at [tbaldwin@uoregon.edu].
-
Rick's and my work was supported by the National Science Foundation under grant #: DGE-0742540. Any opinions, findings, and conclusions or recommendations expressed in these materials are those of the authors and do not necessarily reflect the views of the National Science Foundation. ↩
-
Contrary to popular belief, you don't need to do vector cross products to understand this stuff (although you can if you want to). This aforelinked page makes the best plain-english explanation I've seen. This one has nicer pictures, but I don't read arabic. ↩
-
Treadmills use DC motors because runners want fine control over the motor speed, which is far cheaper to implement for a DC motor than it is for an AC motor. ↩
-
It's important to emphasize that this is not the easiest way to do it. By simply letting the generator driveshaft roll on the rear bicycle tire, you get an even higher gear ratio, and you get it for free - no complicated bike shop wizardry necessary.
The catch is friction - not enough friction. The driveshaft contacts the tire with such a small area that it will surely slip like crazy. You'd need a tension belt for it to work.
Our design uses an entirely chain-linked transmission. It was not trivial to implement, and our final gear ratio wound up a little low. If I did this project again, I would try using a belt first. ↩
-
For some notes on the difference between freehubs and freewheels, and all delicate shades of meaning pertaining to such things, check this page. ↩
-
Used trainers flood craigslist in the summer, but we did this in January - we had to buy new. ↩
-
Most treadmills use belts internally, not chains. This is a great argument for skipping the chain approach: the treadmill motor you pull from the junk yard may already be fitted for belt mode. ↩
-
In contrast, it's obvious to feel the difference in resistance between an open circuit (spinning) and a dead short (crank!). The theoretical concept here is a little more difficult, however. ↩